Software API

Low-level UART (Serial) Functions

Note: If you are connected to the FPGA via the VLAB, then the VLAB runs a serial terminal directly and you can communicate with your FPGA through the VLAB client. You can ignore this bit.

Xilinx SDK has a serial terminal that can be used to communicate with your design. It is in the bottom panel under the heading "SDK Terminal". However, this terminal is line buffered, which means that nothing is sent until you have written a line of text and clicked "Send". If you want to communicate using individual keypresses, you need to use a better serial terminal program. We recommend using GNU screen. You can connect screen by opening a terminal and typing

    screen /dev/ttyUSB1 115200

Note that sometimes the FPGA appears on a different device node, so you might have to try /dev/ttyUSB0 or /dev/ttyUSB2.

Code examples

Most of the time you can use the serial/UART just by using the C standard library. Functions like printf and scanf will work with the UART to output and input accordingly. However you might find that lower-level access to the UART hardware is useful. You can use the functions in xuartps_hw.h to do this. For example:

Low-level UART use
#include "xuartps_hw.h"
 
int main(void) {
	init_platform();

	if(XUartPs_IsReceiveData(STDIN_BASEADDRESS)) { //If the user has pressed a key
    	char byte = XUartPs_RecvByte(STDIN_BASEADDRESS); //Read it in
    	XUartPs_SendByte(STDOUT_BASEADDRESS, byte); //And send it out
    }
}

These functions let you read and write individual bytes.

Contents

Measuring Time

The ARM core contains a monotonically increasing counter, which can be used to measure time in the system without controlling a full countdown timer manually (detailed below). The timer increases at half the ARM clock frequency (i.e. every two clock cycles).

Time can be accessed using the XTime functions, as follows:

XTime Example
#include "xtime_l.h"
 
int main() {
    XTime startTime, endTime, executionTime;
 
	XTime_GetTime(&startTime);
	// Perform execution here
	XTime_GetTime(&endTime);
 
	executionTime = endTime - startTime;
    float timeInSecs = 1.0 * executionTime / COUNTS_PER_SECOND;
}


Countdown Timer

The ARM system has an internal timer which can be used to measure execution times. An example of doing this is shown below:

ARM internal timer
#include <stdio.h>
#include <xscutimer.h>

int main() {
	int i;
	XScuTimer timer;
	XScuTimer_Config *timercfg;

	timercfg = XScuTimer_LookupConfig(XPAR_SCUTIMER_DEVICE_ID);
	XScuTimer_CfgInitialize(&timer, timercfg, timercfg->BaseAddr);

	XScuTimer_LoadTimer(&timer, 500000000);
	XScuTimer_Start(&timer);

	for(i = 0; i < 10; i++) {
		printf("This is something which takes time.\n");
	}

	XScuTimer_Stop(&timer);
	int val = XScuTimer_GetCounterValue(&timer);

	printf("Timer value: %d\n", val);
	return 0;
}

Note that the timer is a countdown timer. xparameters.h includes a #define called XPAR_CPU_CORTEXA9_0_CPU_CLK_FREQ_HZ which is the current clock rate. This can be used to convert clock cycles to time.

A common use of the timer is to trigger a periodic interrupt. The code sample below shows how to set this up.

Using the timer
#include <stdio.h>
#include <xscutimer.h>
#include <xil_exception.h>
#include <xscugic.h>

int count = 0;

void timer_callback(XScuTimer *timer) {
	printf("Beep %d\n", count++);
	XScuTimer_ClearInterruptStatus(timer);
}

int main() {
	XScuTimer timer;
	XScuTimer_Config *timercfg;

	timercfg = XScuTimer_LookupConfig(XPAR_SCUTIMER_DEVICE_ID);
	XScuTimer_CfgInitialize(&timer, timercfg, timercfg->BaseAddr);
	XScuTimer_EnableAutoReload(&timer);
	XScuTimer_LoadTimer(&timer, XPAR_CPU_CORTEXA9_0_CPU_CLK_FREQ_HZ);

	XScuGic_DeviceInitialize(XPAR_SCUGIC_SINGLE_DEVICE_ID);

	Xil_ExceptionRegisterHandler(XIL_EXCEPTION_ID_IRQ_INT,
			(Xil_ExceptionHandler)XScuGic_DeviceInterruptHandler,
			(void *) XPAR_SCUGIC_SINGLE_DEVICE_ID);

	XScuGic_RegisterHandler(XPAR_SCUGIC_0_CPU_BASEADDR, XPAR_SCUTIMER_INTR,
			(Xil_ExceptionHandler) timer_callback,
			(void *) &timer);

	XScuGic_EnableIntr(XPAR_SCUGIC_0_DIST_BASEADDR, XPAR_SCUTIMER_INTR);
	Xil_ExceptionEnableMask(XIL_EXCEPTION_IRQ);
	XScuTimer_EnableInterrupt(&timer);
	XScuTimer_Start(&timer);

	//Create an infinite loop because the CPU shuts down when main() returns
	while(1);

	return 0;
}

Important

The ethernet framework below also makes use of this timer!


Ethernet

The ARM cores can use the Zybo's Ethernet connection to send and receive messages over the network. To use the Ethernet, do the following:

  • In Vitis, double click your project's .prj file and select Navigate to BSP Settings, then Modify BSP Settings.

  • Tick the lwip211 (Lightweight IP) library. (Note: this may be a higher number if a more recent version has been released.)
  • In the list on the left, under standalone, click lwip211. This shows the settings for the library.

  • Expand dhcp_options and set lwip_dhcp to true.

This will bring in the Lightweight IP library, and set it to obtain an IP address by DHCP when your system boots.

Add the following two platform files to your project (or replace them if they already exist). They set up various parts of the system and initialise the hardware.

  • Create a main.c and follow the code structure as in the examples below.

If you are working in C++ then rename platform.c to platform.cpp and the tools should automatically use the correct compilation. You will need to wrap the LWIP includes at the top of platform.cpp in an extern C declaration to tell the C++ compiler to expect a C library. Like this:

extern "C" {
  #include "lwip/tcp.h"
  #include "lwip/init.h
}


Using the Ethernet

The following code structure shows examples of how to use the ethernet:

Ethernet main.c
#include <stdio.h>
#include "xparameters.h"
#include "platform.h"
#include "xil_printf.h"
#include "xil_cache.h"

void udp_get_handler(void *arg, struct udp_pcb *pcb, struct pbuf *p, const ip_addr_t *addr, u16_t port) {
	// Check that a valid protocol control block was received
	if (p) { 
		// The message may not be zero terminated, so to ensure that we only 
		// print what was sent, we can create a zero-terminated copy and print that.
		char msg[p->len + 1];
		memcpy(msg, p->payload, p->len);
		msg[p->len] = '\0';
		
		printf("Message: %s\n", msg);
		
		// This is how we would send a reply back to the address which messaged us on port 7000
		//udp_sendto(pcb, p, addr, 7000);
		
		// Don't forget to free the packet buffer!
		pbuf_free(p);
	}
}

int main() {
	unsigned char mac_ethernet_address[] = {0x00, 0x11, 0x22, 0x33, 0x00, 0xXX}; // Put your own MAC address here!
	init_platform(mac_ethernet_address, NULL, NULL);
	
	struct udp_pcb *recv_pcb = udp_new();
	if (!recv_pcb) {
		printf("Error creating PCB\n");
	}
	
	// Listen on port 7001
	udp_bind(recv_pcb, IP_ADDR_ANY, 7001);
	// Set up the receive handler
	udp_recv(recv_pcb, udp_get_handler, NULL);
	
	// Send an initial message
	// Create a protocol control block (PCB)
	struct udp_pcb *send_pcb = udp_new();
	// Create a packet buffer and set the payload as the message
	struct pbuf * reply = pbuf_alloc(PBUF_TRANSPORT, strlen(message), PBUF_REF);
	reply->payload = message;
	reply->len = strlen(message);
	// Send the message
	ip_addr_t ip;
	IP4_ADDR(&ip, 192, 168, 9, 1);
	udp_sendto(send_pcb, reply, &ip, 8000);
	
	// Don't forget to free the packet buffer!
	pbuf_free(reply);
	
	// Remove the send PCB because we don't re-use it in this example
	udp_remove(send_pcb);
	
	// Now enter the handling loop
	while (1) {
		handle_ethernet();
	}
	return 0;
}

Important things to note:

  • The above code is just to show sample usage, and will not compile as it is.
  • You must use a unique MAC address. In EMBS these are listed on the EMBS Student Network page.
  • Sending and receiving requires a packet buffer (pbuf). You must remember to free these after using them.
  • Sending and receiving also requires Protocol Control Blocks (PCBs). While you can remove these when you've finished using them, we recommend re-using them if you're going to send or receive more than once.
  • After setting up any handlers you must call handle_ethernet().

If you don't have DHCP

The default ethernet code uses DHCP to automatically obtain an IP address from the network, based on your MAC address. If DHCP requests aren't working, it often means you're not connected to the network correctly, or you have a problem with your code. There could also be network issues, so ask a demonstrator if unsure.

If you're sure that you shouldn't be using DHCP (e.g. if you're not using the EMBS network), you can use a manual IP address as follows:

  • Set up the application and BSP as above.
  • Right click your BSP and click Board Support Package Settings. In the left-hand column, under standalone, click lwip202.
  • Expand dhcp_options and set dhcp_does_arp_check and lwip_dhcp both to false.

Now you must provide an IP address and subnet mask manually, as below:

Manually specifying IP address
int main() {
	ip_addr_t ipaddr, netmask;
	IP4_ADDR(&ipaddr, 192, 168, 0, 30);
	IP4_ADDR(&netmask, 255, 255, 255, 0);
	unsigned char mac_ethernet_address[] = {0x00, 0x0a, 0x35, 0x00, 0x07, 0x02};
	init_platform(mac_ethernet_address, &ipaddr, &netmask);
	...
}


Sharing Memory Between HLS and the ARM

To share a large amount of data between the ARM cores and an HLS component you will use main system memory. The Zybo Z7 has 1GB of main DDR memory which can be accessed from an HLS component by using an AXI Master interface on the HLS core.

Look at this diagram. It helps to understand how the system is laid out.

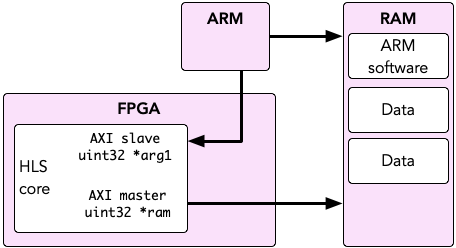
The ARM cores read and write data from main memory. Your HLS core is controlled by the ARM over its slave interface, but it can also access main memory via its master interface. For this reason, you should see why it doesn't make sense to ask "how do I pass data from the ARM core to HLS?". The data is always in memory, instead the ARM core simply needs to tell the FPGA where to look for it.

We can see therefore that the HLS core and the ARM cores are reading and writing from the same memory. Therefore we will declare a segment of that memory that we can use for sharing. The easiest way to do this is to declare a global array, then pass the address of the shared memory into the HLS component using XToplevel_Set_ram:

Declare a segment of shared memory
int sharedmemory[1000]; //Reserve 1000 integers (4000 bytes)
 
int main(void) {
	//Pass the address to the hardware.
	XToplevel_Set_ram(&hls, sharedmemory);
 
	//Rest of the application...
}

In HLS we can read and write from RAM address 0 and it will be offset by the value we passed in with XToplevel_Set_ram to access the shared memory:

Using the address in HLS
uint32 toplevel(uint32 *ram, uint32 arg1) {
	#pragma HLS INTERFACE m_axi port=ram offset=slave bundle=MAXI
	#pragma HLS INTERFACE s_axilite port=arg1 bundle=AXILiteS register
	#pragma HLS INTERFACE s_axilite port=return bundle=AXILiteS register
 
	ram[0] = 1234;
	ram[1] = 5678;
 
	//Or to bulk read/write memory we can use memcpy. eg. to write an array to RAM...
	int output[1000];
	memcpy(ram, output, 4000);
}


In the example above we declared 4000 bytes to use as shared memory between HLS and the ARM cores. This is not only "input" data, it is shared data. If your algorithm needs to read in some input data and produces a chunk of output data, you can arrange it all in the array accordingly. For example, imagine a problem which takes in 400 bytes and produces 400 bytes:

Returning lots of data
int sharedmemory[200]; //400 bytes of input, 400 bytes of output == 800 bytes, or 200 ints.

//Prepare input data
for(int i = 0; i < 100; i++) sharedmemory[i] = get_input_data(i);

//Run the IP core
XToplevel_Set_ram(&hls, sharedmemory);
XToplevel_Start(&hls);
while(!XToplevel_IsDone(&hls));

//sharedmemory[100] to sharedmemory[199] contains the output data

//-------------------------
//Meanwhile in HLS...

uint32 toplevel(uint32 *ram) {
	#pragma HLS INTERFACE m_axi port=ram offset=slave bundle=MAXI
	#pragma HLS INTERFACE s_axilite port=return bundle=AXILiteS register

	int mydata[100];
 
	//Read input data from ram[0-99] into our local cache mydata
	memcpy(mydata, ram, 400);

	//Do whatever we need to do
	processData(mydata);

	//Write mydata out to the return part of memory
	memcpy(ram+100, mydata, 400);
}


Bulk reads and writes with memcpy (include string.h) are faster than reading individual words. For example:

Use of memcpy
#include <string.h>
 
uint32 toplevel(uint32 *ram) {
	#pragma HLS INTERFACE m_axi port=ram offset=slave bundle=MAXI
	#pragma HLS INTERFACE s_axilite port=return bundle=AXILiteS register
 
	int datain[50];
 
	//Using individual reads
	for(int i = 0; i < 50; i++) {
		datain[i] = ram[i];
	}
 
	//Using memcpy
	memcpy(datain, ram, 50 * sizeof(int));
}

Both the loop and the call to memcpy do the same thing, but memcpy is much faster because HLS will use what is called a burst transfer to copy in data at a faster rate. You can also memcpy data out to RAM.

Remember that the system contains caches! If you simply write data and do nothing else the ARM will write and read from its caches, which are not visible to the HLS component. Also any memory changed by HLS will not invalidate the ARM's cache lines so you may not see the updates. You must flush the caches when you want to force the ARM to write to or read from system memory. For example:

Caching
#include <xil_cache.h>
 
int shared[1000];

int main() {
	//Write to shared
	...
 

	//Force the writes to main memory
	Xil_DCacheFlush();
	//or alternatively Xil_DCacheFlushRange((INTPTR) shared, sizeof(shared));
 
	//Start the HLS component
	XToplevel_Start(&hls);
    ...
 
	//Invalidate the shared memory cache, forcing the ARM to re-read it from main memory
	Xil_DCacheInvalidate();
	//or alternatively Xil_DCacheInvalidateRange((INTPTR) shared, sizeof(shared))

	...
}

This code uses Xil_DCacheFlush() and Xil_DCacheInvalidate() to flush changes from the cache to main memory and re-read from main memory into cache. Xil_DCacheFlushRange() and Xil_DCacheInvalidateRange() can also be used to specify regions of memory that have changed.

If you are having issues which you suspect are cache-related you can completely disable caches by calling Xil_DCacheDisable(), but this will make your code a lot slower.


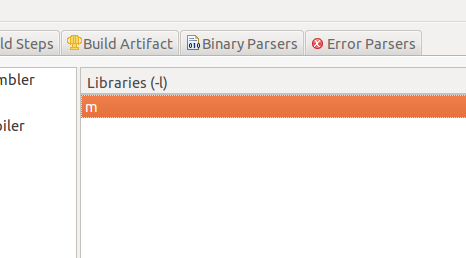
Using C Maths Functions

Functions such as sin and floor are defined in the standard C header math.h. If you use this you may find that the compiler does not include the maths library by default, resulting in errors like:

undefined reference to `sin'

To fix this:

  • In SDK, right click your application project and select Properties
  • Go to C/C++ Build | Settings
  • In the Tool Settings tab, under ARM v7 gcc linker click Libraries
  • Click the Add button and enter m