Using the Xilinx Tools Remotely
Local Xilinx Tools Installation
Installation Notes for EMBS Students
At the time of writing, the version of the tools installed in the student hardware labs is 2020.2. You have to grab the entire single archive installer because Xilinx recently changed the Web Installer to now only install the most recent version of the tools.
Download "Vivado HLx 2020.2 - All OS installer Single-File download"
Also note that Xilinx only directly support some specific distributions of Linux so you might get an error about missing libraries which can be fixed by following this link.
Installing the Xilinx software on your computer may seem the simplest solution, but they are enormous; around 60GB for the bare minimum set of features required for EMBS, and increasing to about triple that for a full install (which is rarely necessary and not recommended).
With that said, if you want to go down this route you can. First go to the Xilinx website, create a free account, download the installer, and unarchive it, and run it.
On Linux:
tar xzf Xilinx_Unified_2020.2_*.tar.gz
cd Xilinx_Unified_2020.2*
chmod +x xsetup
./xsetup
(The chmod may not be necessary, it makes the installer executable - which it should be already - but sometimes isn't.)
On Windows, you need to extract the archive, which you can do with something like 7-zip. The install archive it is a gzipped tarball, which means an archive that is bundled into a single file with tar and then zipped with gzip. If the result of your unarchiving is just a single .tar file, extract it again, and you should now get the files. Once fully extracted there will be an xsetup.exe that you can run.
After saying that you do not want to download a new version (if it prompts you), it will ask you to log in (again) and then which version you want to install.
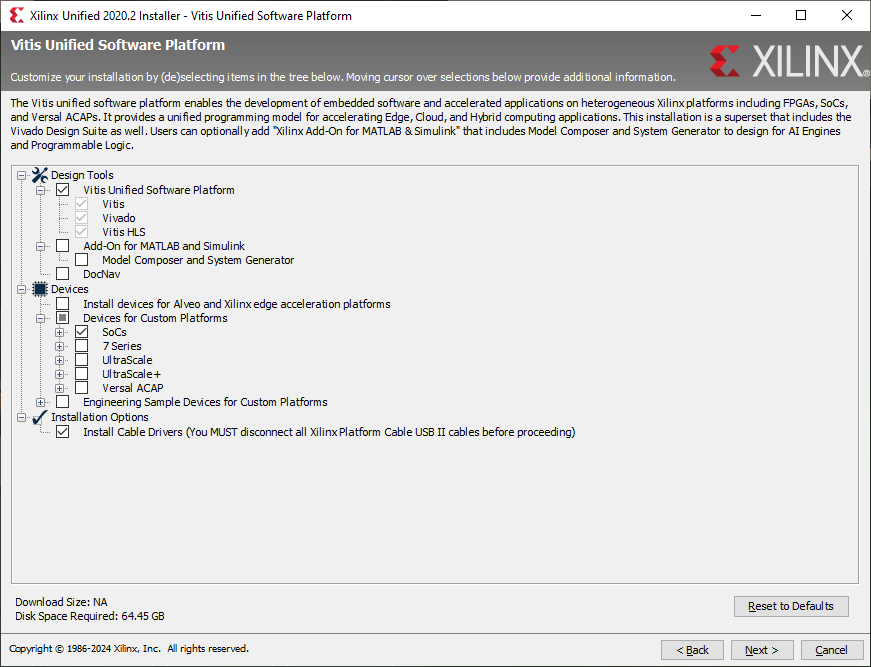
For EMBS, or if just using standard features and small FPGA boards (e.g. the Zybo), select Vitis.
For EMBS, choose the following set of installation options:
After a long download and installation process, the tools should now be installed.
They can be run from the launchers created by the installation, or from a terminal as follows:
source /tools/Xilinx/Vivado/2020.2/settings.sh
vivado
Using the Zybo Z7 (EMBS) boards
If you are using a Zybo board (e.g. for EMBS) you will also need to install the Digilent board definition files. You can do this by clicking Install/Update Boards when creating a new project (this will take a long time) and then in the "XHub Store" selecting "Boards → Digilent Inc. → Single Part → Zybo Z7-10". Right click it and select Install. A green tick mark should appear.
Alternatively you can download the archive of the vivado-boards Github repository and extract it.
After installing Vivado, open the extracted archive and copy the 'new/board_files/zybo-z7-10' folder into:
/tools/Xilinx/Vivado/2020.2/data/boards/board_files
(Assuming you installed the tools to /tools/Xilinx. This same process works for the Windows version, but to wherever Windows installs the tools instead.)
Connecting through the SSH Gateway
If you are trying to access the VLAB from your home machine, you need to set up SSH access through the IT Services SSH gateway. Do the following:
Linux / macOS
Create an SSH key pair on your local machine with ssh-keygen.
ssh-keygen
It will ask where to save the keys, accept the defaults.
Add the following to your SSH config file (~/.ssh/config). If you don't already have such a file, create it.
Host ssh.york.ac.uk
   User YOUR_USERNAME

Host rts001.cs.york.ac.uk csteach0.york.ac.uk
   User YOUR_USERNAME
   ProxyCommand ssh -A -T -o Compression=no ssh.york.ac.uk -W %h:%p
Once this is done you can type:
ssh-copy-id csteach0.york.ac.uk
to copy your key to the SSH Gateway. (If you are research staff, use csresearch1.york.ac.uk). You will have to enter your password multiple times.
You should now be able to just connect using SSH:
ssh -Y csteach0.york.ac.uk
You can use this to run the Xilinx applications on the CS servers. On Linux this will just work, but on other operating systems you will need to install an X server to be able to see the GUI of the tools (such as XQuartz for macOS, or Xming for Windows). Install and run the X server and now if you run things they will magically appear on your own desktop as if you were running them locally (albeit slowly).
Windows 10/11
Go to Control Panel → Programs → Programs and Features → Turn Windows features on or off
Enable Windows Subsystem for Linux, click OK, and let your machine reboot.
After the reboot, open the Microsoft Store and install Ubuntu (or a Linux distribution of your choice).
Once installed, run the Ubuntu "app" and then follow the Linux instructions above, after moving the vlab.py and your keyfile into the Linux subsystem.
cd /mnt/c/path/to/files/under/windows
mv vlab.by me.vlabkey ~
cd ~
Alternatively, it is likely that PuTTY can implement the required connection tunnelling. If someone figures out how, add a comment below.
Running the VLAB
Now that you have the tools running remotely, you will need to use the VLAB to connect to an FPGA and work with it. The VLAB Quickstart Guide is here.
Using the VLAB on a Shared Machine
If you're connecting to the VLAB on a shared machine where multiple people might be connecting at once (e.g. from one of the department's compute servers) you will need to specify a custom local port so that your connection doesn't collide with another user's.
You can use the -l or --localport option to vlab.py to specify a port that is different to the default value (12345), then specify this in Vivado instead.
If the web port is colliding you can specify that with -w
Almost any port in the range 1024 to 65535 should work if it is free. For example:
|
Where "itsusername" is your ITS username, i.e. abc500.
